
Crackerbox Stamps - What the Duck!

Hi Everybody! 

Some of the products I have used have been provided to me from various companies I design for. Affiliate links may be used in the links provided below.

I made this card with the recent release stamps from Crackerbox StampsThere are lovely new stamps and sentiments. Go and check them out HERE.

I first stamped the two ducks. Colored them with Copic markers. Die cut the big one and fuzzy cut the little one. Used some foam tape on three sides of the back of the square panel to make it possible to pull out the sentiment. Stamped the sentiment onto a strip of paper to make it fit behind the square. Assembled the card using patterned paper. Rounded the corners of the sentiment strip.

The stamps I used:
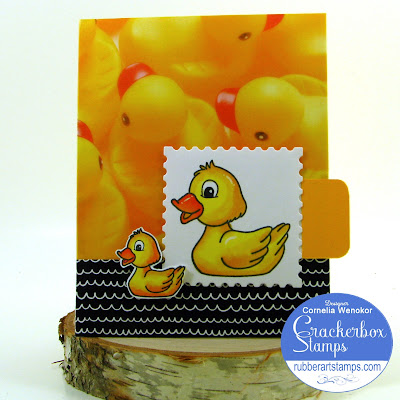
Here is my card with the tab put back in.

I hope you liked this. Thanks for visiting!
Happy Stamping!

 Linking up with :


Comments

conil said…
Can you say adorable? The mileage you're getting out of these sweet duckies is wonderful.
aussie aNNie said…
Stunning colours design and creativity ♥

Popular posts from this blog

Mirror Image Stamping with So Suzy and the MISTI

Hi Everyone, I am so happy to be part of this wonderful event - the collaboration between So Suzy and the MISTI from My Sweet Petunia doing mirror image stamping.  This event is going on for the ENTIRE  MONTH! We are demonstrating the  Mirror Image Stamp    which coordinates with the Misti Stamping Tool! All month long, different bloggers will post a card using the  Mirror Image Stamp .  In my tutorial today, I will show you how use the  Mirror Image Stamp  on your cards. You can basically double your stamp supplies that way! The  mirror image stamp  is  a 4.25" x 5.5" piece of red rubber with no foam backing. So much larger than the other mirror image stamps out there and therefore much more useful! Mirror Image stamp ,  Two Cats in a Tree If you want a video tutorial on how to do this I can highly recommend you watch THIS VIDEO on youtube. Explains it all in very little time! Or you can see the...

Easter Egg and Bunny

Hi Everyone, I made a bunch of Easter cards, after all its little more than one month and I need to send them out in time... You see, they are all similar - using both the die cut and the negative, that I cut from a die cut egg. The cute bunnies got their yearly appearance - they are from Impression Obsession. the egg is by Lifestyle Crafts. The sentiment is by Papertrey. And here are bigger photos from this set: Linking up with Creative with Stamps - Easter The Paper Players - die cutting Die Cut Divas - animals Happy Little Stampers - anything goes with dies

Combined So Suzy and The Ton Blog Hop

Hi Everyone, I am sooooo excited to be part of this amazing event - a combined hop between So Suzy Stamps and The Ton! I have been eyeing The Ton stamps and dies for quite a while - they are just gorgeous! And So Suzy - well you have seen their stamps on my blog - they are simply fabulous! I also love that they are made from rubber - its different stamping with them. Its much better for generational stamping and they don't stick to your paper when you use your Misti. You may have arrived from the fabulous  Eunji - its a hard act to follow her.... I got those gorgeous  Peonies Dies  from The Ton and die cut them with water color paper. Spritzed Dylusion inks on a sheet of plastic and dipped the dies into the colors. Mounted them onto black card stock. Added the So Suzy Birthday sentiment - heat embossed in white. Lastly I added a strip of envelope liner paper at the bottom. Here are my supplies: So Suzy Birthday sentiment ,  Peo...