
So Suzy Tulips

Hi Everyone,

I am have a photo tutorial today for So Suzy Stamps. 
And since its supposedly spring (just recovering from yet another Nor Easter) - I choose those beautiful tulips for my blog post.


I got inspired by a blog post from Maria Fischer from rieslingmama, who got this from Tim Holtz. I watched part of his lengthy YouTube Video, but it really is not necessary. But if you have nothing better to do, go for it!


How did I get this background?

I smooshed distress oxide ink onto my ancient craft mat


spritzed it with water


dipped the glossy side of my cheap photo paper (Costco) into the mess. Dried it and dipped again. I did not want the entire surface covered, so I stopped. But you can keep going as long as you dry your paper in between (used a heat gun).


Added Finetec gold splatters.


I used the acrylic plate of a stamp positioner to get an idea about how to add the tulips


Stamped them onto the paper with Catherine Pooler ink - that works beautiful on glossy card stock. I did some generational stamping, but the last impression was week, so I used the stamp positioner, to overstamp and get a good impression.


Trimmed and matted my card base and added a black die cut as sentiment. I did experiment with white and gold, but I liked black the best.


You may know this already, but just in case you don't.... We have a new feature here at So Suzy's. 
You get a stamp with every order free.
This month it is THIS stamp:


We also have a sale going on at this month, but not much longer:
Happy Smooshing!


Linking up with:
The Male Room - watercolors (even guys like tulips)
The Sisterhood of Crafters - spring flowers
Cards in Envy - no patterned paper
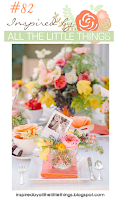
Inspired by all the little things - see inspiration photo below

Please Grab Our Badge!Share Our Badge!

Comments

Mimi said…
So beautiful... Love it.
Darlene said…
Very creative and beautiful! Thanks so much for joining us at The Sisterhood’s ‘Spring Flowers’ challenge and please come back again soon!
Darlene
one of the 'Sistahs'
The Sisterhood of Crafters
DAR’S CRAFTY CREATIONS Please come for a visit!

conil said…
Nor 'easter or not this screams Spring. Love the color and those gold splatters. It's for sure black sentiment was a good choice...draws your eye to the colors more.
Nora Noll said…
This is lovely!! I like how you created the background!!
Such a Beautiful card, I didn't know you could use photo paper for this, thank you. Good to see you in our challenge at The Male Room. Faith DT
Debbie Mageed said…
Beautiful card! Love this technique - will have to give it a go soon. :D Thanks for the tutorial, too! Thank you so much for playing with the Spring Flowers challenge at the Sisterhood of Crafters and hope you will join us again soon!
papierelle said…
Und noch so ein toller Hintergrund, die Goldsprenkel sind das i-Tüpfelchen!!
Leigh Penner said…
Beautiful take on the inspiration photo!
Vicky Briggs said…
Such a colorful card to bring in the spring! Love the instructions!!
Anita in France said…
What a gorgeous background for those lovely tulips, Cornelia ... love the touches of glimmery gold! Hugs, Anita :)
Mac Mable said…
Artsy background and loving that stamp x
Rosmarie said…
Sieht fantastisch aus, sowas muss ich auch mal ausprobieren!
Vickie Y said…
Beautiful, vibrant background for the lovely tulips. Thank you for sharing with us at The Sisterhood of Crafters.
KimCreate said…
Such a pretty card! Thanks for joining us at Inspired by all the little things.
Chris said…
Those backgrounds are so much fun to create, I love the bright and cheery colors you have used for your tulips. Thank you for sharing your card with us at The Male Room.
Chris

Popular posts from this blog

Easter Egg and Bunny

Hi Everyone, I made a bunch of Easter cards, after all its little more than one month and I need to send them out in time... You see, they are all similar - using both the die cut and the negative, that I cut from a die cut egg. The cute bunnies got their yearly appearance - they are from Impression Obsession. the egg is by Lifestyle Crafts. The sentiment is by Papertrey. And here are bigger photos from this set: Linking up with Creative with Stamps - Easter The Paper Players - die cutting Die Cut Divas - animals Happy Little Stampers - anything goes with dies

STAMPlorations Coffee Mini Hop

Hi Everyone, I am so happy to be part of STAMPlorations mini hop  and Spring Lovers Coffee hop featuring Becca's awesome new set! I immediately fell in love with it! You probably have seen my other card I made with this set, if not, you can see it HERE . My supplies:    Bunnies'N Beans , Latte stencil I sponged the ARTplorations stencil and colored the bunny with Copics and fuzzy cut him. Added Washi tape. The other new released set is: Always Tea Time Hop over to STAMPlorations to see some inspiration cards with both sets from your oh so talented DT group! And don't forget to leave a comment - one winner will get the bunnies, another winner will get tea time! The winners will be announced March 27! The sets are not discounted BUT we have a 15% off coupon code for everything in the store, including these stamps, and it's good until March 2 . Use code SPRINGCLBH Also linking up with: Simon Says Wednesday challenge

Mirror Image Stamping with So Suzy and the MISTI

Hi Everyone, I am so happy to be part of this wonderful event - the collaboration between So Suzy and the MISTI from My Sweet Petunia doing mirror image stamping.  This event is going on for the ENTIRE  MONTH! We are demonstrating the  Mirror Image Stamp    which coordinates with the Misti Stamping Tool! All month long, different bloggers will post a card using the  Mirror Image Stamp .  In my tutorial today, I will show you how use the  Mirror Image Stamp  on your cards. You can basically double your stamp supplies that way! The  mirror image stamp  is  a 4.25" x 5.5" piece of red rubber with no foam backing. So much larger than the other mirror image stamps out there and therefore much more useful! Mirror Image stamp ,  Two Cats in a Tree If you want a video tutorial on how to do this I can highly recommend you watch THIS VIDEO on youtube. Explains it all in very little time! Or you can see the same thing on my photo tutorial. With mirror