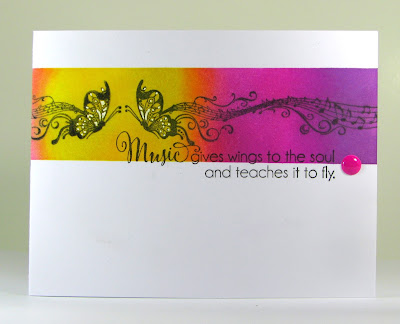
So Suzy Mirror Image Butterflies

Hi Everybody,

I decided to play with my mirror image stamp from So Suzy. And I also wanted to make a card where the stamping on the front continues to the back of the card. 


Did I confuse you? In case I did - here is a better picture:

My stamp supplies:


I first did a trial run on a piece of scrap paper. Then I lined up my butterfly stamp with the mirror image stamp in my Misti. Inked it up and stamped several times - you need to do that in order to get a good impression on your paper.


It worked!


I then took another piece of scrap paper to make sure I line up the butterfly stamp accurately. If its not precise it won't look good..


Good enough.


I then took some red tape (not the blue painters tape, the red is lees sticky and won't tear your paper) too mask off the card stock. Ideally you want to sponge first and then stamp, to not smudge the ink, but this is a somewhat complicated process, so I just made sure the ink is really dry.


And here is my finished strip:


I used the plastic sheet from my stamp-a-majic to make sure I line up the sentiment perfectly and then used my Misti to stamp it.


I added an enamel dot and some white Sharpie accents to the butterflies.


I am so pleased with how this came out. A bit of work, but worth it!

Happy mirror image stamping!

Linking up with:
Shopping our Stash - Butterflies, Bees and Bugs (stamps older than one year)

Grab Our Badge!


Comments

Mimi said…
OOooh, so many comments I want to make! First, I love your colors. Second, that is a cool technique with your Misty! And third, I have had good luck with Frogtape-- it is yellow tape, and it says "For delicate surfaces." But now I want to try the red! (I love testing different supplies!) Thank you for hanging with us at SOS again this week.
conil said…
...and the work was soooooo worth it. How unique and fabulous looking. Those butterflies appear to be dancing off the card and the colors make my heart beat faster.
Wonderful idea and your card is so beautiful with those bright colors.
Anita in France said…
Wow, Cornelia ... I was sure those butterflies were fluttering in time to the music ... they're beautiful! Gorgeous colours, brilliant detailing ... and all soooo worth the work ... what a stunner! Hugs, Anita :)
Wow! Your card is so cool! I love how you continued the coloring on the back and your colors were amazing! Thanks for sharing your card with us at Shopping Our Stash! Cyndi, DT
Donna said…
Gorgeous card! Love the wraparound image!
Thanks for getting buggy with the crew from SHOPPING OUR STASH!!

Popular posts from this blog

Katzelkraft - Stampotique Raven

Hi Everyone, Do you know that   Katzelkraft has aquired Stampotique stamps? This fun raven is designed by Daniel Torrente (#6314). I used an old background from my stashs.  I stamped the bird and colored it with alcohol ink markers.  I brushed distrss ink onto the background and added some pattern with the   Mandala Magic stencil  from Funky Fossil Designs.I used one of the border stamps on the left for more interest.  Stamped the sentiment  and doodled a frame around the sentiment.Added a googly eye to the bird and drew in some eye lashes.  The stamps I used are from the following sets: Spiral Borders - KTZ286,  Whatchamacallit  - KTZ276  (FRANCE) Spiral Borders  - KTZ286 , Whatchamacallit  - KTZ276 (USA) Hope you liked this - I'll be back next Wednesday with more Katzelkraft inspiration.  Thanks for visiting! Happy Stamping! Linking up with: Simon Says Wednesday challenge  - fur or feathers

Suzanne's Surprise Blog Hop

Hi Everyone, I have a very special card for you today - a birthday card for Suzanne, the owner and talented force behind So Suzy Stamps! And we are celebrating this wonderful occasion with a special blog hop! You may have arrived from the wonderful Giada , our Italian contingent :) HAPPY BIRTHDAY Suzanne! I used the Blowing Butterflies  (heat embossed in gold)  and the Birthday Wishes  to create my card. I cut myself a gold frame from glitter paper and added a water color wash. I opened the frame on the side to have the butterflies and color spill out. Added lots of splatters and the heat embossed sentiment Your next stop on the hop is the talented Henriette - you are going to love her card! And just in case you get lost - below are all the participants listed. You even can get lucky and win a $20 gift certificate for So Suzy Stamps - sponsored by Justine and a  Bunkie Bag from Simply Charming Everyday, but you have to le...

Some more Christmas Cards...

Hi Everyone, there still are some Christmas cards  I made awhile ago and have not yet posted.... This one I made for the  Runway Inspired Challenge . The inspiration photo is below. I found it a little tricky to make this into a Christmas card, but with the help  of Neat&Tangled stamps it worked....The stitched dies are by Simon Says. Added some Washi tape on top (the headdress) and silver glitter paper at the bottom (the floor and silver shoes) and voila a Christmas card! My second card I made with an iStencil, gold embossing paste, faux pearls, an enamel dot and lots of splatters. The stitched die I cut the Kraft panel with is by Simon Says. I love this stencil and stenciled cards are just so quick and easy to make. I used this one for several cards this year, on of which you can see HERE . http://www.istencils.com/store/products/22-00029 I am linking up this card with: Stamps and fun=Creativity - Christmas U...