
STAMPlorations Stamps and Technique and a Tutorial

Time for a new monthly challenge at STAMPlorations! You are going to like this - its use your favorite technique (or I guess any technique ) and stamping!


I choose to do "emboss resist".


The challenge ends April 30, the winner will be announced May 6.
PRIZE
The winner will receive 2 clear stamp sets of her choice from the Vignette, Patchwork Frenzy, and Subway Art series. (Visit the shop to see the available stamp sets.) Also, the winner will be invited to be a Guest Designer.

A TWIST IN OUR CHALLENGES
Participate in all 3 challenges we host this month and you'll be in the running to win This month's random prize draw winner will receive 1 package of Tsukineko BRILLIANCE Dew Drop PLANETARIUM ink pads: Galaxy Gold, Platinum Planet, Starlite Silver, and Cosmic Copper


courtesy of our sister shop, All About Scrapping.

So hop on over to STAMPlorations, to see what our fabulous DT has in store for you! We also have the ueber talented Sian as guest designer this months. 

--X--

At Less is More the theme is Round and Round - perhaps my card is a bit more than less, but I'm going to link it anyhow...

Its perhaps a stretch, but I am linking this up with Addicted to CAS - the theme is "Wheel" - for me it fits, using all those color wheels. Lets see what the DT thinks....


I am also linking up this card with the current Inkspirational challenge - you have to CASE
Sandie from London Days  - one of their talented DT members. So I snooped around in her flickr account (much easier than finding anything on th eblog) and came up with THIS card, that I wanted to CASE


See the similarity? I just love this card! Its so pretty!

In case you are wondering, how I made my card - I have a little tutorial for you:

My supplies: 


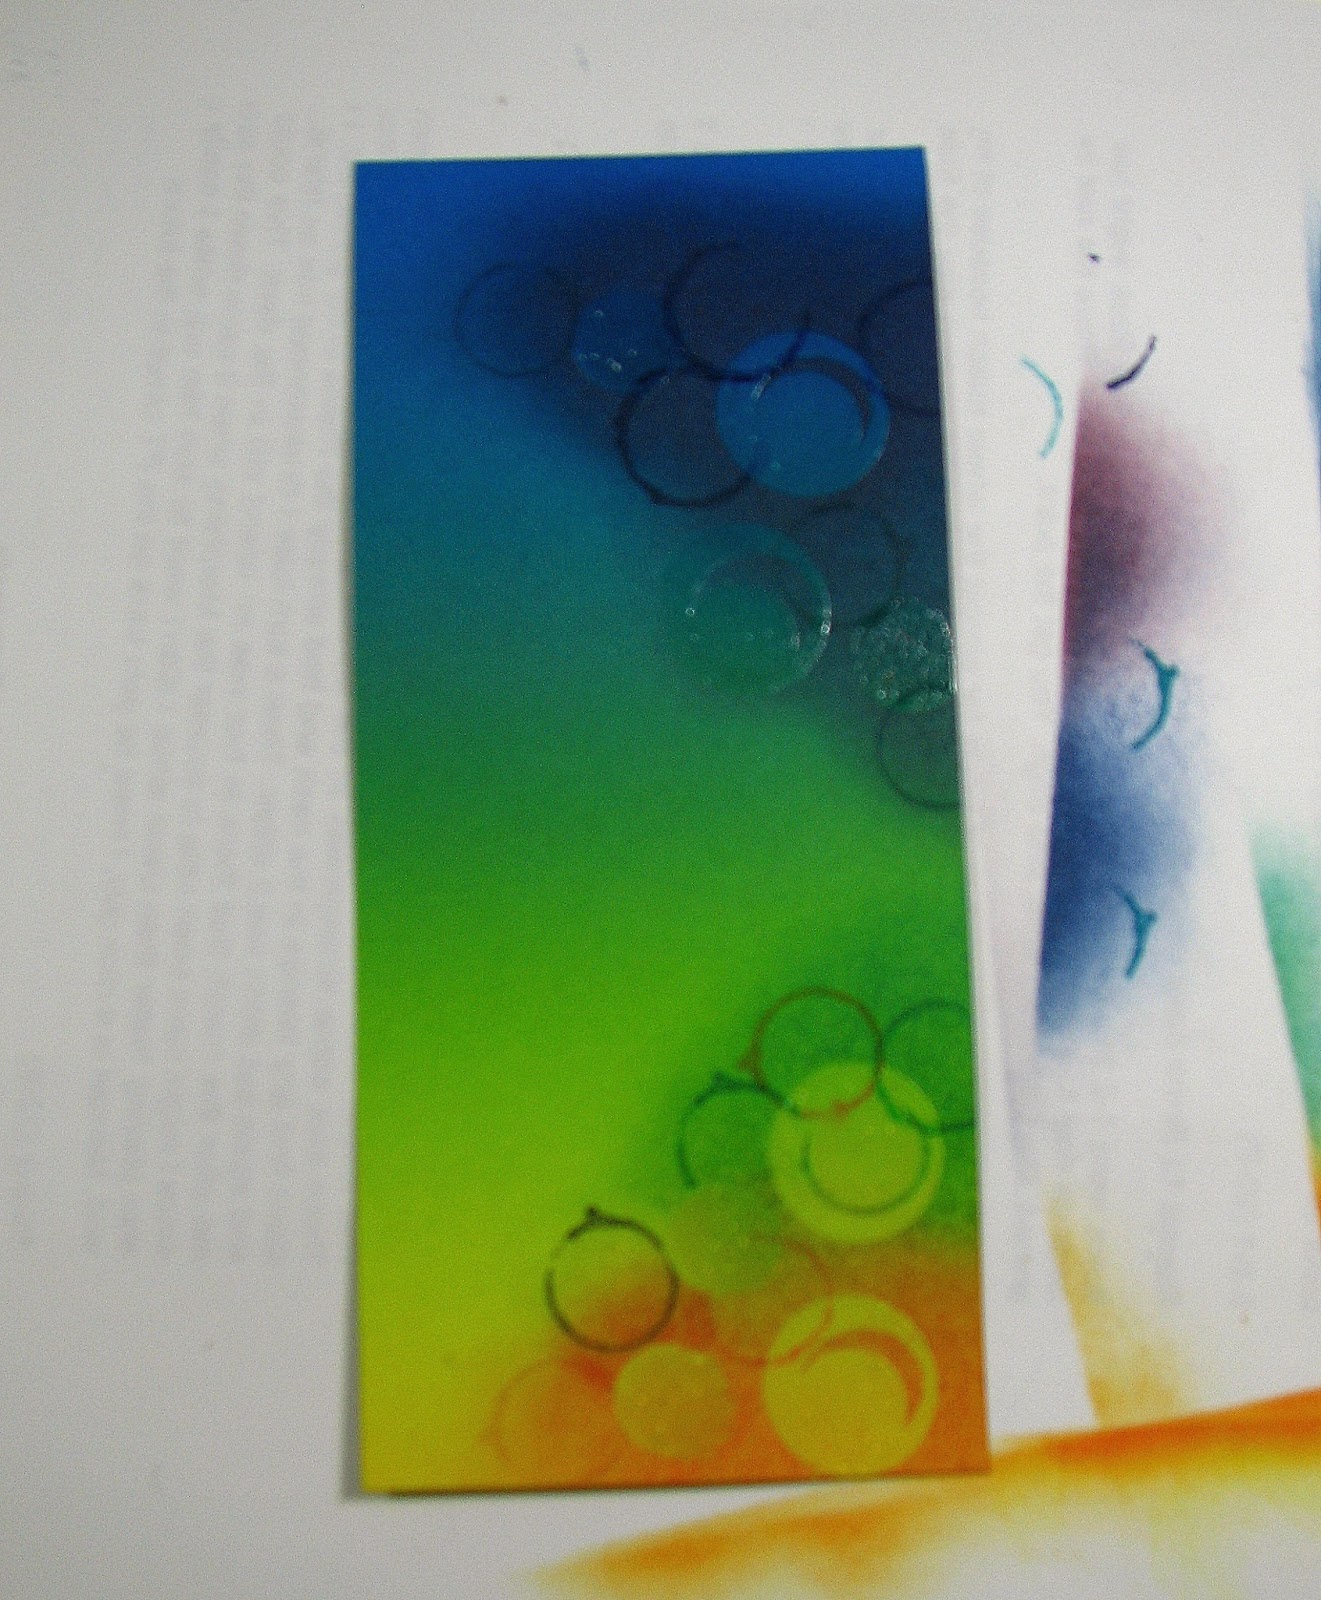
Wiped the colored pice of cardstock with the embossin buddy. Stamped some of the circles with Versamark, sprinkled clear embossing powder on it and heated it with a heat gun.


Sponged around the embossed areas, repeated the process with additional circles, both in the upper and lower part of the paper strip. Make sure your ink is completely dry and use that embossing  buddy!(Sorry for the blurry pictures.....)


Took some of the circles from the Holiday Artsy set and just stamped on the card with the above shown inks. Took a 1 inch and 1 1/2 inch punch and punched out additional circles of colored card stock. I trimmed the paper to 5 1/2 inches in length.
        

Did another round of emboss resist on the 1 inch circles, added the sentiment and assembled everything with foam tape under the large circles:


I hope you like it!


Comments

Flo said…
Ujujuj das hört sich sehr kompliziert und nach viel Arbeit an. Toll ist deine Karte geworden!!! Gratuliere!!! LG
Mistys Mum said…
Hi
That is a fabulous card. x
Kim M said…
Oh I love this, Cornelia!! The colours are so vibrant! What kind of ink did you use? Great CASE of Sandie's card! :-)
sandie said…
wow, I am honoured you CASed one of my cards and that is a really old one but I do still love that one! I love how you have taught us how you built this card up, the richness of the colours are fab and I love the Artsy set and you have used it really well here. Thanks for joining us at ATCAS and Ink x
shirley-bee said…
So retro! Love the vibrant colours.
Jutta said…
Awesome card! Thanks for the great tutorial too!
Nonni said…
What a great card and good tutorial! I love the retro look of this. Somehow I start to think of space when I look at this! Thanks for joining us at Inkspirational too! xx
Anonymous said…
Awesome card and love your tutorial! I love the intensity of the colors. Great CASE of Sandie's card -- I see the similarities, but I love how it's still different and has the "Cornelia style" :o)
Monika Reeck said…
komplicated and sooo lovely liebe Cornelia I love the result...Deine Karte ist special und wunderbar...big hugs from Munich..today was only 17 Grad und nicht zu Warm dear Cornelia...
MRS DUCK said…
Hi Cornelia
Striking as always. Love your colour choice as I'm very partial to bright and vibrant.
Have a great weekend.
Ang x
Vicki Dutcher said…
So stunning! Your sponging is to die for!
Susanne Vargas said…
You are on a clean and graphic roll, my friend! Very cool card and you even made a tutorial, woohoo!
Cathy said…
This is gorgeous Cornelia, I love the vibrant colors, Cathy x
Chrissie said…
This is a late visit for me this week.
What a fabulous card... I love the vibrant colour choices!
Thanks so much
Chrissie
"Less is More"
maria f. said…
Doesn't surprise me that emboss resist is up there on the list of faves. It is just so much fun to get messy with ink. And magic too. Love the bold colors, Cornelia.
Rosmarie said…
Tolle und kräftige Farben auf dieser Karte! Das Schwarz/Orange auf der zweiten finde ich auch total schön!
Sian Ridley said…
Another absolute stunner! This is so beautiful :) Thank you so much for welcoming me at STAMPlorations this month - I am humbled :)
Marina said…
Fabulous vibrant colours and I love the way you've made the circles.
Thank you for joining us at Inkspirational Challenges. Come back next time! Marina
Michelle Lupton said…
Love all your colours - I can just see those colour wheels spinning like gears! Thanks for playing along with our "Wheels" challenge at ATCAS :)
Anonymous said…
Hi Cornelia. Fabulous colours and great emboss resist, love it! have a fab day! hugs Monika xxx

Popular posts from this blog

Katzelkraft - Stampotique Raven

Hi Everyone, Do you know that   Katzelkraft has aquired Stampotique stamps? This fun raven is designed by Daniel Torrente (#6314). I used an old background from my stashs.  I stamped the bird and colored it with alcohol ink markers.  I brushed distrss ink onto the background and added some pattern with the   Mandala Magic stencil  from Funky Fossil Designs.I used one of the border stamps on the left for more interest.  Stamped the sentiment  and doodled a frame around the sentiment.Added a googly eye to the bird and drew in some eye lashes.  The stamps I used are from the following sets: Spiral Borders - KTZ286,  Whatchamacallit  - KTZ276  (FRANCE) Spiral Borders  - KTZ286 , Whatchamacallit  - KTZ276 (USA) Hope you liked this - I'll be back next Wednesday with more Katzelkraft inspiration.  Thanks for visiting! Happy Stamping! Linking up with: Simon Says Wednesday challenge  - fur or feathers

Suzanne's Surprise Blog Hop

Hi Everyone, I have a very special card for you today - a birthday card for Suzanne, the owner and talented force behind So Suzy Stamps! And we are celebrating this wonderful occasion with a special blog hop! You may have arrived from the wonderful Giada , our Italian contingent :) HAPPY BIRTHDAY Suzanne! I used the Blowing Butterflies  (heat embossed in gold)  and the Birthday Wishes  to create my card. I cut myself a gold frame from glitter paper and added a water color wash. I opened the frame on the side to have the butterflies and color spill out. Added lots of splatters and the heat embossed sentiment Your next stop on the hop is the talented Henriette - you are going to love her card! And just in case you get lost - below are all the participants listed. You even can get lucky and win a $20 gift certificate for So Suzy Stamps - sponsored by Justine and a  Bunkie Bag from Simply Charming Everyday, but you have to le...

Combined So Suzy and The Ton Blog Hop

Hi Everyone, I am sooooo excited to be part of this amazing event - a combined hop between So Suzy Stamps and The Ton! I have been eyeing The Ton stamps and dies for quite a while - they are just gorgeous! And So Suzy - well you have seen their stamps on my blog - they are simply fabulous! I also love that they are made from rubber - its different stamping with them. Its much better for generational stamping and they don't stick to your paper when you use your Misti. You may have arrived from the fabulous  Eunji - its a hard act to follow her.... I got those gorgeous  Peonies Dies  from The Ton and die cut them with water color paper. Spritzed Dylusion inks on a sheet of plastic and dipped the dies into the colors. Mounted them onto black card stock. Added the So Suzy Birthday sentiment - heat embossed in white. Lastly I added a strip of envelope liner paper at the bottom. Here are my supplies: So Suzy Birthday sentiment ,  Peo...